Hi it's Jennifer here with a tutorial on a
Slim Line Layered Shaker Card using dies you already have
without the extra expense of buying Slim Line ones.
I added on the bottom of this tutorial a mini tutorial on how to
enlongate diecuts.
Products Used :
Copics
Skin - E0000, E000, E00, E04, E11, E21, R20
Hair - BV02, BV20, BV25, BV29
Kimono - W0, W01, W03
Flowers - R12, YR23, Y35
Teapot - C05, C07, C09
So to start with I used the largest Scalloped Rectangle and using black card stock
enlongated the die cut so that it is 28 scallops long.
I cut a rectangle in apricot card stock 4'' x 7 7/8'' then using the largest
Double Stitched Rectangle I cut the longest enlongated rectangle I could out of it
and it layered perfectly on the black scalloped card stock.
The Tutorial for Enlongating is at the bottom of this post.
I cut a cardbase in white 8'' x 7 7/8''.
I also cut 1 piece of Acetate 3'' x 7''
I cut a white piece of Card Stock 3'' x 7''.
The Asian Fusion Paper is cut at 6'' x 3'' and another piece 1'' x 3''
I then glued both pieces of the Asian Fusion Paper on to the white card stock.
It doesn't mater the join doesn't match as you wont see it.
I then used the Luggage Tag enlongated to die cut a hole 3 3/8'' long aproximately.
I then glued the acetate on the back I used 3D tape on the back to create a shaker.
I used sequins to fill it and a scenery piece of Asian Fusion Paper
for the backing.
I then used 3D tape to layer the black Scallop and Apricot on the base card.
I do like a shaker on my cards so I cut out the below pieces using
The second largest Scalloped Circle, 3rd largest Stiched Circle,
3rd largest Double Stitched Circle
The Asian Fusion Paper and acetate are cut from the 3rd largest Stitched Circle
I created a shaker as below adding a few sequins.
I then layered both shaker pieces on to the base.
I die cut my pieces in black and Coloured Mona up. As Mona was too long
I cut her to fit.
Added all my pieces and Voila all done.
I Hope you got some Inspiration from this tutorial and below are some others
I have done using the same ideas for the base.
So this one I added extra layers, same shaker windows
using different dies and upright.
The Same Design but more layers see how you cann't see
the join on the top layer.
This one I used a plain white top layer and die cut into it to create the shakers
How to Enlongate a Die Cut
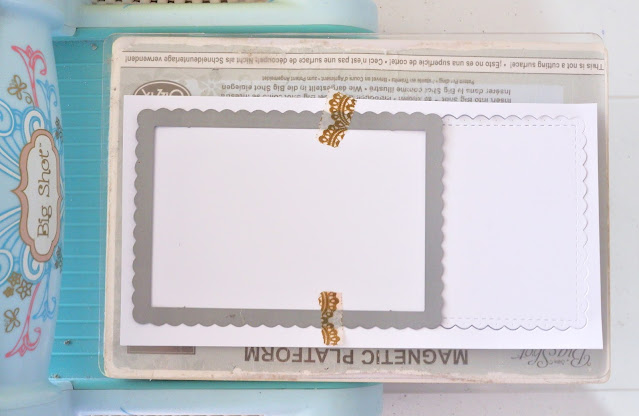
First you cut you card stock longer that required.
Then you place your die to one end of the cardstock and in your die
cutting machine. Go to die cut as per normal but pull the top plate
back from the end of the die as you dont want to cut the end off.
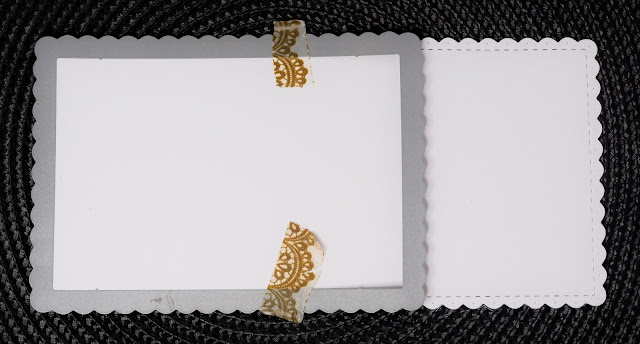
So you have now cut it like this.
You then match up the scallops with the die and move the die along until
you are going to cut the amount of scallops you want and tape it with
washi to hold it.
Then place your top plate to where you want to cut like before as it will only
cut as far as your top plate is along.
I have made this one 28 scallops long for the Slim Line Card.
This is how you elongate.


Wonderful cards and a great tutorial.
ReplyDeleteI pinned it.
Sorry if it's a duplicate comment. I don't remember if I closed the window before publishing. Oops.
these cards are amazing!
ReplyDeleteamazing cards!
ReplyDeletelove one with ducks!