Followers

Tuesday 22 December 2020

Uniquely Creative - December Mini Kit


Hi everyone I am here with this STUNNING  New Release 

so take a look at the video below for

from 


and this is  what you get in your Adorable Kit


Celebrate Wonderful

Card Size : 6'' x 4 5/16''

Colours Used :

Copic Markers

BG02, V04, Y35

Kit Products Used : Butterflies Stamps, Sentiment Cut-A-Part, Patterned Papers

Add On's – Cut-A-Part Essentials #5 Die, Butterflies Die

Uniquely Creative Extras – Ice Sequins, Enamel Dots, Iridescent Pearls, Stitched Window Frame Die

Extras : White Card Stock, Black Card Stock, 3D Tape, Tape Runner, Vellum, Versa Mark, White Emboss Powder


Sunday 20 December 2020

Uniquely Creative Tutorial - Christmas Joy


All your products are avaliable at Uniquely Creative

 Card Size:  6'' x 4 3/4"

Uniquely Creative Products Used 

Aussie Christmas 2 Stamp Set, Cut-a-Part Sheet, Aussie Christmas 2 Laser Cut, Patterned Papers, Aussie Christmas 2  Die, Star Wreath Die, Starry Sequins, Ice Sequins

Other Products Used

White and Red Cardstock , 3D Tape, Tape Runner, Versa Mark, Gold Embossing Powder

Colours Used

Copic Markers:
Kangaroo – E42, E43, E44, E47
Mittons, Hat Trim  – C00, C03, C05, C07, C09
Reds –  R35, R37, R39

Instructions

1. Cut a base 9 1/2'' x 6'' in white cardsotck. Cut layers in red cardstock 5 3/4'' x 4 1/2'', patterned paper 5 1/2'' x 4 ¼'', red cardstock 4 ¾'" x 3 ½", and white  cardstock 4 ½'' x 3 ¼''.

2. Die cut the Star Wreath in Red, Green and White cardstock. Colour the Kangaroo with Copic markers.

3. Gold heat emboss the 25 December laser cut, the edge of the smallest piece of white cardstock and also the edge of the white Star Wreath die cut. Glue the the Wreaths together layering Red, Green and White on top, all just offset so you can see a hint of colour.

4. Layer the Card Layers using 3D Tape and glue the Wreath on.

5.  Decorate the card using the Stars from the Wreath and Sequins.

Saturday 19 December 2020

Bellarific Friday _ Yeti Christmas


 Hi just under 1 Week until Christmas

 and my Cards are done  so I have now started on next year's and will try and be ahead 😊.

So here's my Card for


for

and our Theme this week is 

Stamp Of The Month Collection


and I used


and I also used the 


I used
Catherine Pooler - Crater Lake Sequins

Copics
Skin - E0000, E000, E00, E04, E11, E21
Beard, Fur - W00, W0, W01, W03
Santa's Suit - R32, R35, R37, R39
Ribbon- YG00, YG17, YG21, Y23
Present - Y00, Y15, Y35, Y38


Don't forget to take a look
at what the rest of my teamies have to
inspire you with Here!

Plus don't forget the
Stamp of The Month
is
A Gift From Yeti
with 50% off.

 There is also the colouring challenge at
on FB where you can enter the new challenge
for the Month of
and the theme is
and you just might to win some Bella Bucks.
You also should pop on over to the Blog to see all my
 Teamies Amazing  Cards and projects there this week.
Enjoy your Weekend and Happy Crafting. 


Jennifer 

Thursday 17 December 2020

La-La Land Crafts 14 Days Of Christmas - Day 14


Hello everyone! Welcome to Day 14 of the annual La-La Land Crafts 14 Days of Christmas!

Jennifer here with you today to share a tutorial with you!

Today's tutorial is:  A Double Easel Card

This is a Great Extra special Card for Christmas or if you have completed all your
cards you could turn it into a Great Winter or Birthday Card.


PRODUCTS USED
Skin: E000, E00, E04, E11, E21
Hair: E51, E53, E55, E57
Dress, Hat Trims: BG11, BG45, BG57, BG72
Hat, Boots, Candy Cane:  R32, R35, R37, R39, 89
Trims: W00, W0, W01, W03
Holly Leaves: G21, YG63, YG67

PAPER CUTS & SCORING
White cardstock:
Card Base 11 x 4 1/2 Score @ 5 1/2, 8 1/4
Card Easel 5 1/2 x 4 1/2
Small Card Base 5 x 2 Score @ 2 1/2, 3 5/8
Small Easel 2 1/2 x 2
Large Clock Die
One of the Suitcase Side Layer Die

Brown cardstock:
Scalloped Elongated Rectangles x 2  19 scallops x 15 scallops
 2 x 2 5/16 x 1 13/16
Largest Pierced Scalloped Circles Die
2 x Pinecone Bough* Die
Hands of the Large Clock Die

Aqua Cardstock:
2 x Double Stitched Rectangles diecut  Elongated to fit in the Brown 
Scalloped Enlongated die cuts
Largest Double Stitched Circles Die
3 x Pinecone Bough*Die

Red cardstock:
4 x Pinecone Bough*Die
Large Clock Die

Home For Christmas Paper Pack:
Red snowflake 4 15/16 x 3 13/16
Light woodgrain 4 15/16 x 3 13/16
Light woodgrain 2 x 1 1/2
Dark woodgrain Pinecone Bough*Die 4 pinecones
Poinsettia aqua Stitched Nested Circles Die second Largest 
Poinsettia aqua Poinsettia Die 

Clear Acetate:
Stitched Nested Circles Die second Largest 


~ now for the tutorial you have been waiting for ~ 
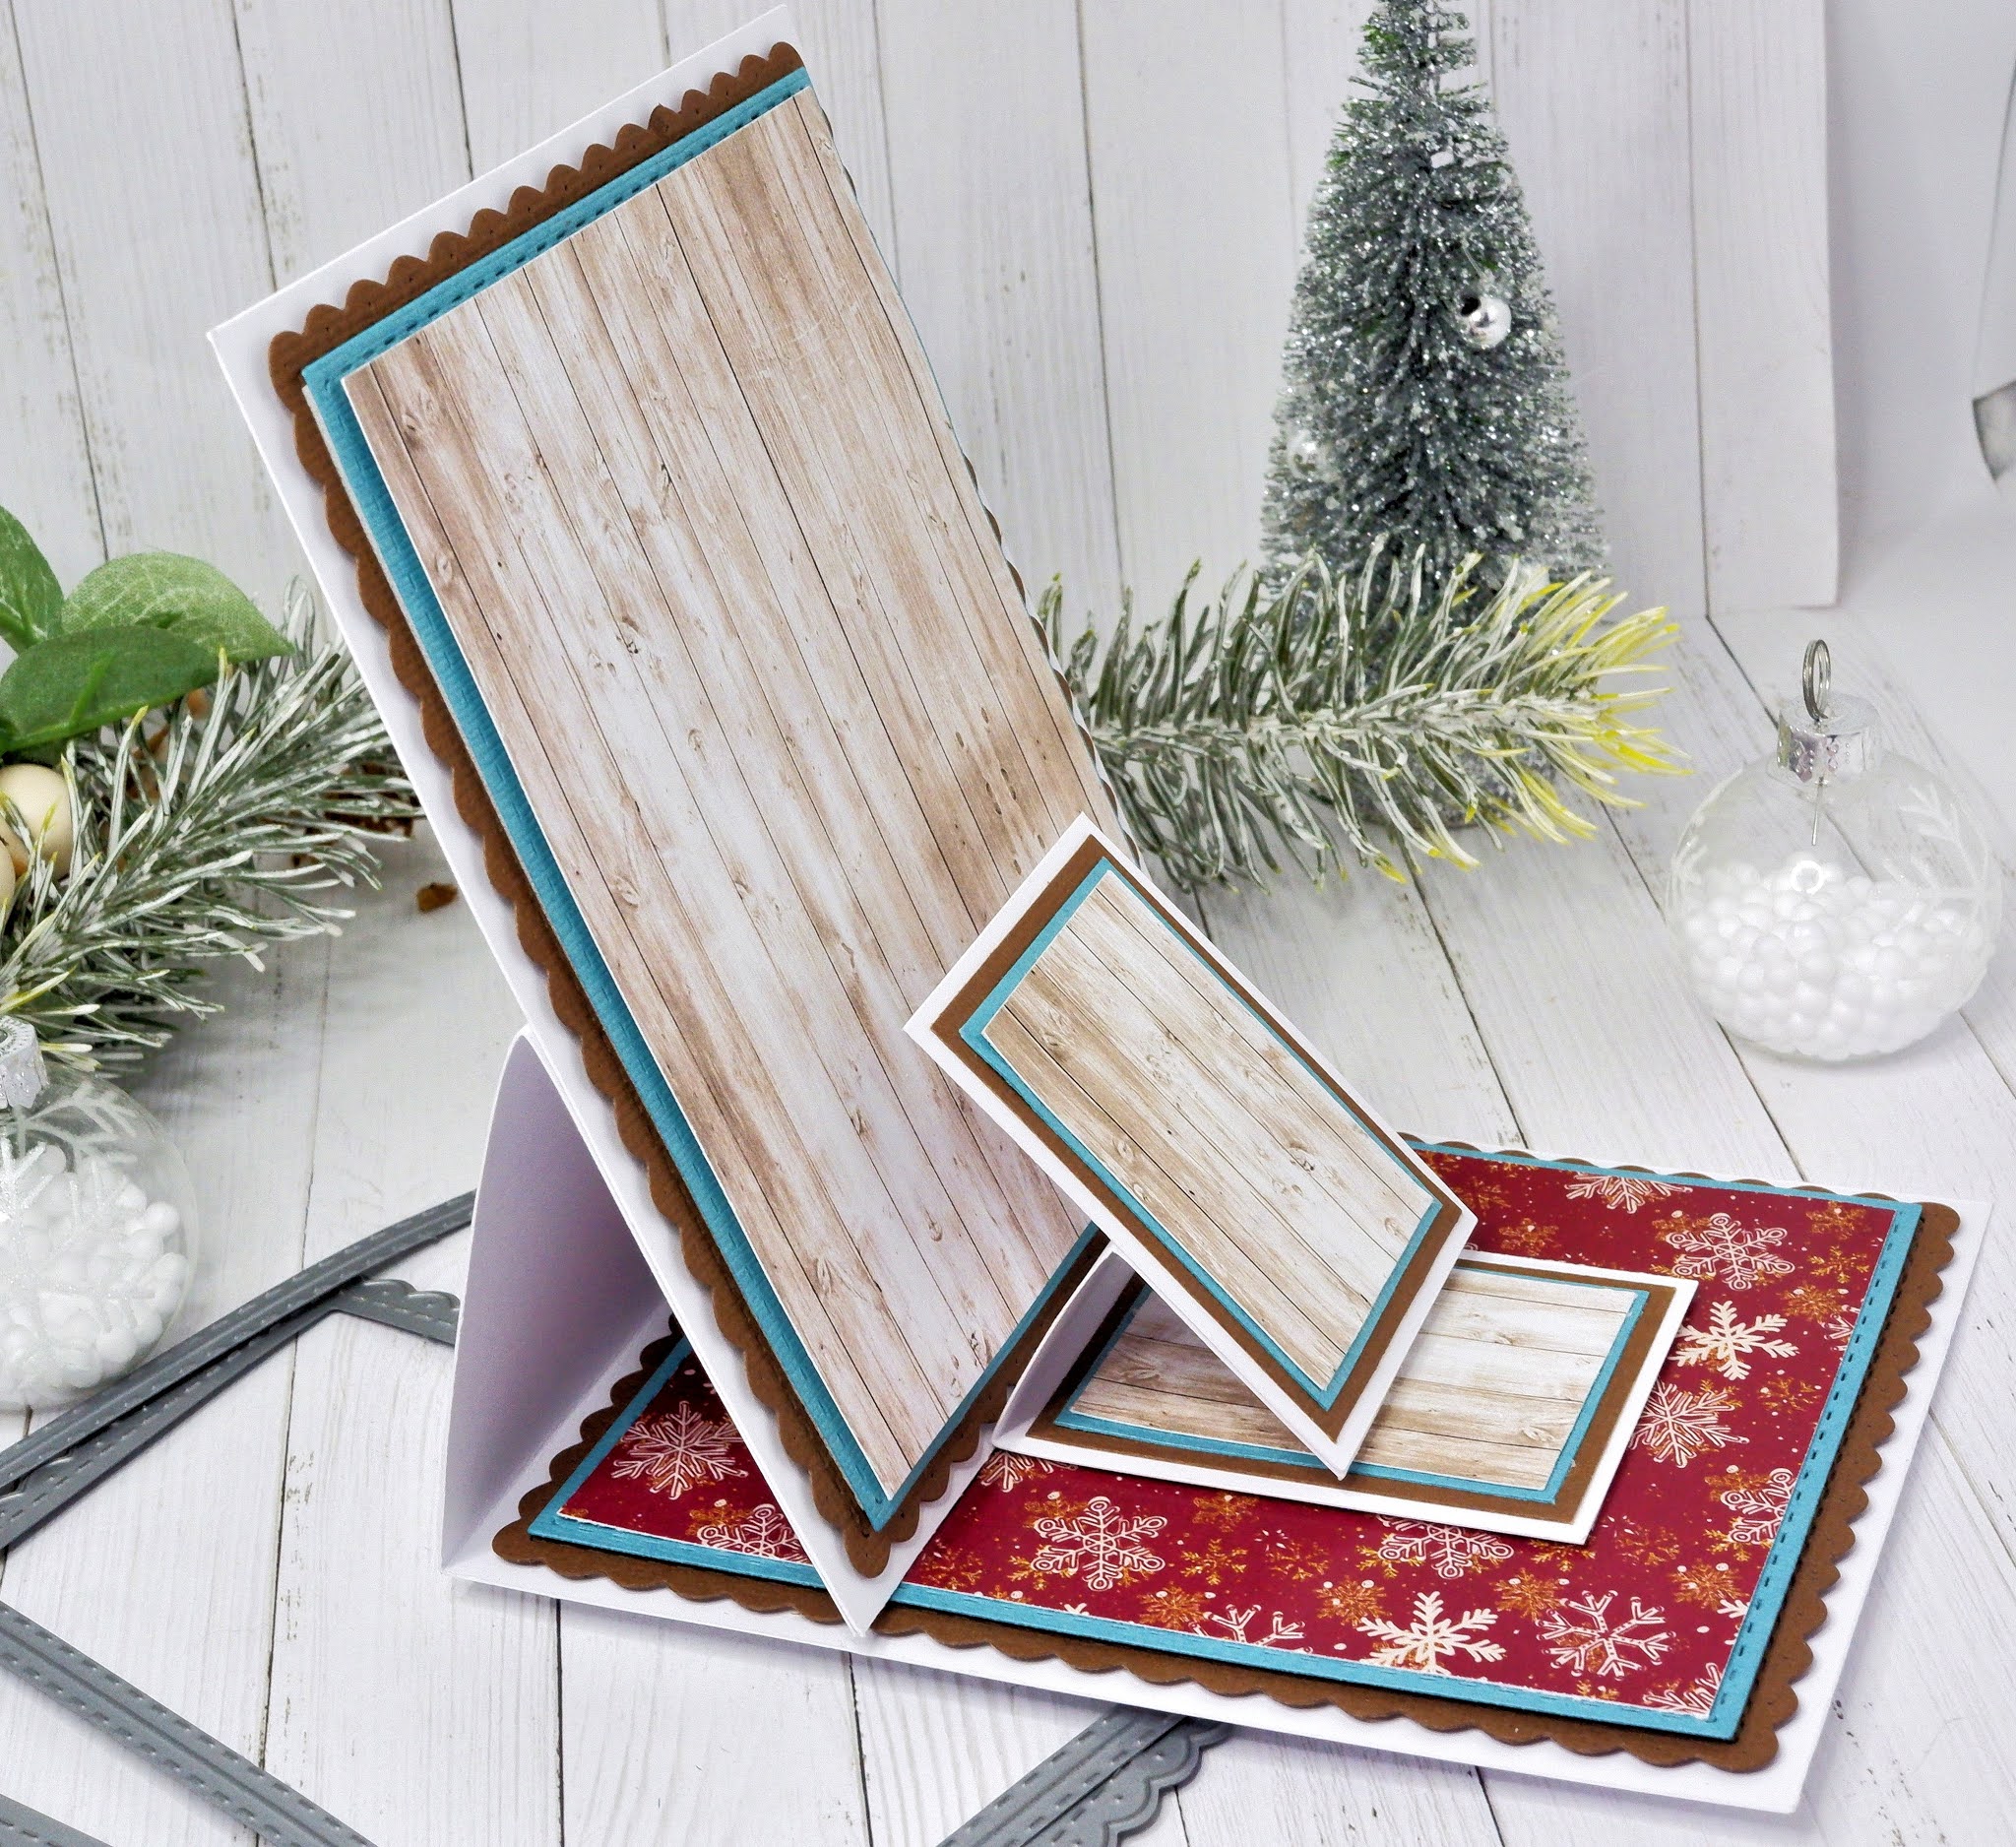
my 3D Double Easel Card with a shaker clock.


Side look.


A the yummy products used.


First of all I Cut and Scored the card base.


I then cut the layers for the card base and easel.


I then layered them up using 3D tape on the brown and aqua layers.  I then just taped the rest.


I then cut and scored the small easel card base and easel.


Next I cut all the small layering pieces.


I then layered and taped them together.


I then taped the easels to there bases as in the picture.  Next I 3D taped the small easel card on to the big card about 1 inch in.


Time to create the shaker clock so I cut out these pieces from the list above.
I then layered and taped them together.


I also cut a red clock out as well and used just the numbers.


I used the white clock and  I popped out the numbers and the holes all the way around. I then glued acetate to the back I glued the red numbers in the holes and used the brown hands.
I added a copic coloured pearl to the centre to match Marci's dress. Next I used 3D tape around the back of the clock and popped little crystals in it and the poinsettia aqua circle  on the back to create the shaker. I then layered it on the aqua stitched circle and brown scalloped circle.


I then created a poinsettia using the 2 diecuts. I inked around them in aqua ink and curled the petals using my bone folder. In the center I popped 6 white pearls and 1 red one that fitted on the die cut perfectly. 
I 3D taped then together in the center.


I then diecut the pinecones and used brown ink around them. I also diecut the pine needles
to embellish the card. I coloured Marci up and she looked Gorgeous in the vintage look colours.


I attached Marci to the small easel card and then embellished the card with all the pieces we diecut.
I finished it off by stamping a Happy Christmas sentiment on the Suitcase Side Layer Die and 3D' it so the small easel could rest against it.


I hope you enjoyed this Card Tutorial and look forward to seeing 
what you create with it.


Saturday 12 December 2020

Bellerific Friday - One Sip Too Many Gnome


 Hi just under 2 Weeks until Christmas

 and I am on the last of my Cards or maybe some for next year  and be ahead 😊.

So here's my Card for


for

and our Theme this week is 

Vintage
(Any Stamp not from the New Release)

and I used


and I also used the 


I used
Catherine Pooler - Crater Lake Sequins
Stamping Up - Designer Series

Copics
Skin - E0000, E000, E00, E04, E11, E21
Outfit - BG11, BG45, BG49
Beard, Fur - C00, C0, C01, C03
Berries, Shoes - R32, R35, R37, R39
Leaves - YG00, YG01, YG17, YG67
Ribbon - Y00, Y15, Y35, Y38


Don't forget to take a look
at what the rest of my teamies have to
inspire you with Here!

Plus don't forget the
Stamp of The Month
is
A Gift From Yeti
with 50% off.

 There is also the colouring challenge at
on FB where you can enter the new challenge
for the Month of
and the theme is
and you just might to win some Bella Bucks.
You also should pop on over to the Blog to see all my
 Teamies Amazing  Cards and projects there this week.
Enjoy your Weekend and Happy Crafting. 


Jennifer 

Saturday 5 December 2020

Bellarific Friday - A Gift From Yeti


Hi Everyone it is less than 3 weeks to Christmas so I am just 

 getting my last cards done to go in the mail on Monday.

So here's my Card for


for

and our Theme this week is Stamp of the Month and it is

A Gift From Yeti

and I also used the 


I used
Paper Roses - Clear Crystals
Gold Stars
Gansai Tambi - Gold No. 91

Copics
Skin - E0000, E000, E00, E04, E11, E21, R20
Fur - W00, W0, W01, W03, W05
Present - R35, R37, R39
Ribbon - C05, C07


Don't forget to take a look
at what the rest of my teamies have to
inspire you with Here!

Plus don't forget the
Stamp of The Month
is
A Gift From Yeti
with 50% off.

 There is also the colouring challenge at
on FB where you can enter the new challenge
for the Month of
and the theme is
and you just might to win some Bella Bucks.
You also should pop on over to the Blog to see all my
 Teamies Amazing  Cards and projects there this week.
Enjoy your Weekend and Happy Crafting. 


Jennifer 

Monday 30 November 2020

La-La Land Crafts - Day 1 December Release


 I am so Excited to be  here and show you the New 


for


Products Used -
Dashing Through Clear Stamp Set -
Large Clock Die -
Mountains Die -
Ski Lodge Die -
Home For Christmas Paper Pack -
 Pierced Scalloped Circles ...
Stitched Nested Circle Die ...
 Double Stitched Hills Border Die ...

Copics
Pigs - R000, R11, R12, R22
Ski's, Snowboard - E42, E43, E44
Grey Sweater, Scarf - C01, C03, C05
Aqua Sweater, Hat, Scarf - BG11, BG57, BG75

Uniquely Creative - Santa Stop


Hi everyone I am here with my second Card from the New Release 
and it is this very Cute Bilbi filling up the Sleigh. This Release is another
  Great Aussie Christmas Animal one
so take a look at the video below.

from 

Uniquely Creative
and of what you got

Santa Stop


Card Size : 6'' x 4 3/4


Colours Used :

Copic Markers

Grey – W00, W0, W01, W03

Nose, Ears, Feet – R20, RV83

Yellows – Y15, Y17, YR23

Greens – YG23, YG63 YG67

Reds – R35, R37, R39, RV69

Sign – YG95


Kit Products Used : Aussie Christmas 2 Stamp Set, Cut Apart Sentiment, Chipboard,

Patterned Papers

Add On's – Aussie Christmas 2 Die

Uniquely Creative Products – Snowy Sequins, Ice Sequins,


Related Posts Plugin for WordPress, Blogger...