Followers

Showing posts with label Lawn Fawn Inks. Show all posts

Thursday, 21 February 2019

The Rubber Buggy - Dogs In Pots


Hi I am here for
The Rubber Buggy
 and this week I have used this 
Very Very Cute Stamp from Wild Rose Studio Called 
Dogs in Pots. 
The Back Gingham Background I created using the Gingham Background
Stamp from Lawn Fawn which worked brilliantly so I will definitely
 be using that again. I finished the card of with a few embellishments using
 a Paper Doily, Flowers, Sequins and a Paper Bow using Lawn Fawn's Put A  Bow On It.

Copics
Dog1 - C0, C01, C03, C05, C07, C09
Dog2 - E11, E13, E5, E18
Dog3- E50, E51, E53, E55
Pots - E40, E41, E43
Yellow's - Y15, Y18, YG03
Purples - BV02, BV04, V04
Pinks - RV00, RV69, R81, R85, 
Wild Rose Studio - Dogs In Pots Clear Stamp (CL515)
Lawn Fawn Gingham Backdrops Stamp Set

Lawn Fawn - Large Stitched 4 Bar Rectangles Lawn Cuts (LF-1026)


25mm Mulberry Open Roses Pink

Lawn Fawn Ink Pad - Jet Black Premium Ink


Thursday, 23 August 2018

Birthday Dragon


Hi it's Jennifer here with this very Adorable Dragon for
 He isn't quiet as
 vibrant as he looks. I do find Purple a hard colour to photograph.
I have created a little scene inside the shaker using the LF mountains die.
I used Lawn Fawn Inks Freshly Cut Grass and Noble Fir to colour
 the mountains.  I used the stitched rectangle on an angle to add
 some interest with the stitched frame raised using 3D Tape. I then
just layered the green and purple Bazzil.

Copics I used
Purple - V12, V15, V17
Greens - YG17, YG21, YG23
Bird - B21, B24, E40, E42
I then usen the colourless blender and left big dots all over him 
to create scales.


Wild Rose Studio Clear Stamp - Dragon & Bird
Lawn Fawn - Stitched Mountain Border Lawn Cuts (LF-1201)

Lawn Fawn - Stitched Rectangle Frames Lawn Cuts
Lawn Fawn - Small Stitched 4 Bar Rectangles Lawn Cuts (LF-1027)

Lawn Fawn - Fancy Scalloped Rectangle Stackables Lawn Cuts (LF1322)

Lawn Fawn Ink Pad - Jet Black Premium Ink

I hope you all have a Great Crafting Week

Jennifer

Wednesday, 24 January 2018

The Rubber Buggy - A Litte Bundle


 Hi I am here for The Rubber Buggy with a Sweet Little Baby Card Tutorial.
I have used the Lawn Fawn Little Bundle Set.

I then masked the edges and stamped in versermark the 
bib, hat, booties and nappy. I then embossed it with Silver Pearl

I then layered them up the beautiful Violet Papers are from

 I also stamped the jumpsuits and dress out of the Violet Paper.
I used Copics to hightlight them. I cut a 
I also Stamped the clothes line across the Stitched Circle.

 I Stamped Little pegs where the clothes went and 3D
the Outfits and added a Sentiment.

 A Close up.


Happy Creating

Jennifer

Monday, 25 December 2017

15 Minute Christmas Card


Good morning it's Jennifer from Australia and it is already
 Christmas here.  So my post for
So I am going to show you a quick last minute 
card you can just whip up.
So I have just die cut the largest LF Small Stitched Rectangle
twice and then placed random snowflakes from the 
 but I left them in place. The second rectangle I glued on the
back so the pieces didn't fall out.
Next I diecut the same Snowflakes in Glitter Paper and glued
 them on top. I then Layered the the rectangle on glitter paper and 
then on to LF Fancy Scalloped Rectangle and on to a card base.
 done. Well I did add a few Pearls for the the Snowflakes.


OK Everyone have a Really Lovely Christmas and New Years
and see you back next week. Off to bake lunch for Dinner and Tea 20ish 
plus family and friends.

Merry Christmas
Love
Jennifer

Wednesday, 22 November 2017

Lawn Fawn- Shaker, Slider Box Card


Hi I am here for
The Rubber Buggy
 with a Shaker, Slider Box Card my Sister Challenged
me to it so I gave it a go and really love how it came up.
I used all Lawn Fawn Goodies I will give you a list at the end.

So I have a slider on the front flap and  on the back one I have created the 
shaker in the snowy mountains. I might have to take a close up for you.
The slider was too long so I did a partial die cut one end then a partial
die cut from the other end it worked beautifully.


I hope you enjoyed this Cute Little Box Card. I will add the instructions
 again from the Shaker Box Card I did last year saving you look for them.
This is the list of the goodies I used for this card.


Hi I am here for The Rubber Buggy to show you how to put
 together  this Awesome and I mean Awesome and a must have 
for any cardmaker die  the LF Scalloped Box Card.
So all the dies are in the packet and lots of embellishing
ones too that I didn't use. First I cut out two of the Box.
I also used the small layer die to cut out one of the larger 
scalloped tops to make a window.


I cut 3 of the inserts.


Then I put accetate over it and my 3M tape 
popped a few sequins in it.

I then created the background using 8cm x 10.5 cm 

Then placing it over the sequins.
I then added a layer cutting two 5.3cmx 5.3cm and one
5.3cm x 7.9 cm

cutting two 5.3cm x 4.5cm and one 4.5cm x 7.9cm

  
I then used the layers from the kit this is the bottom of the box
and missed the pic for the top layer. I used
LF Winter Perfectly Plaid.


So you can see the shaker here and see where I have joined
the two pieces together.


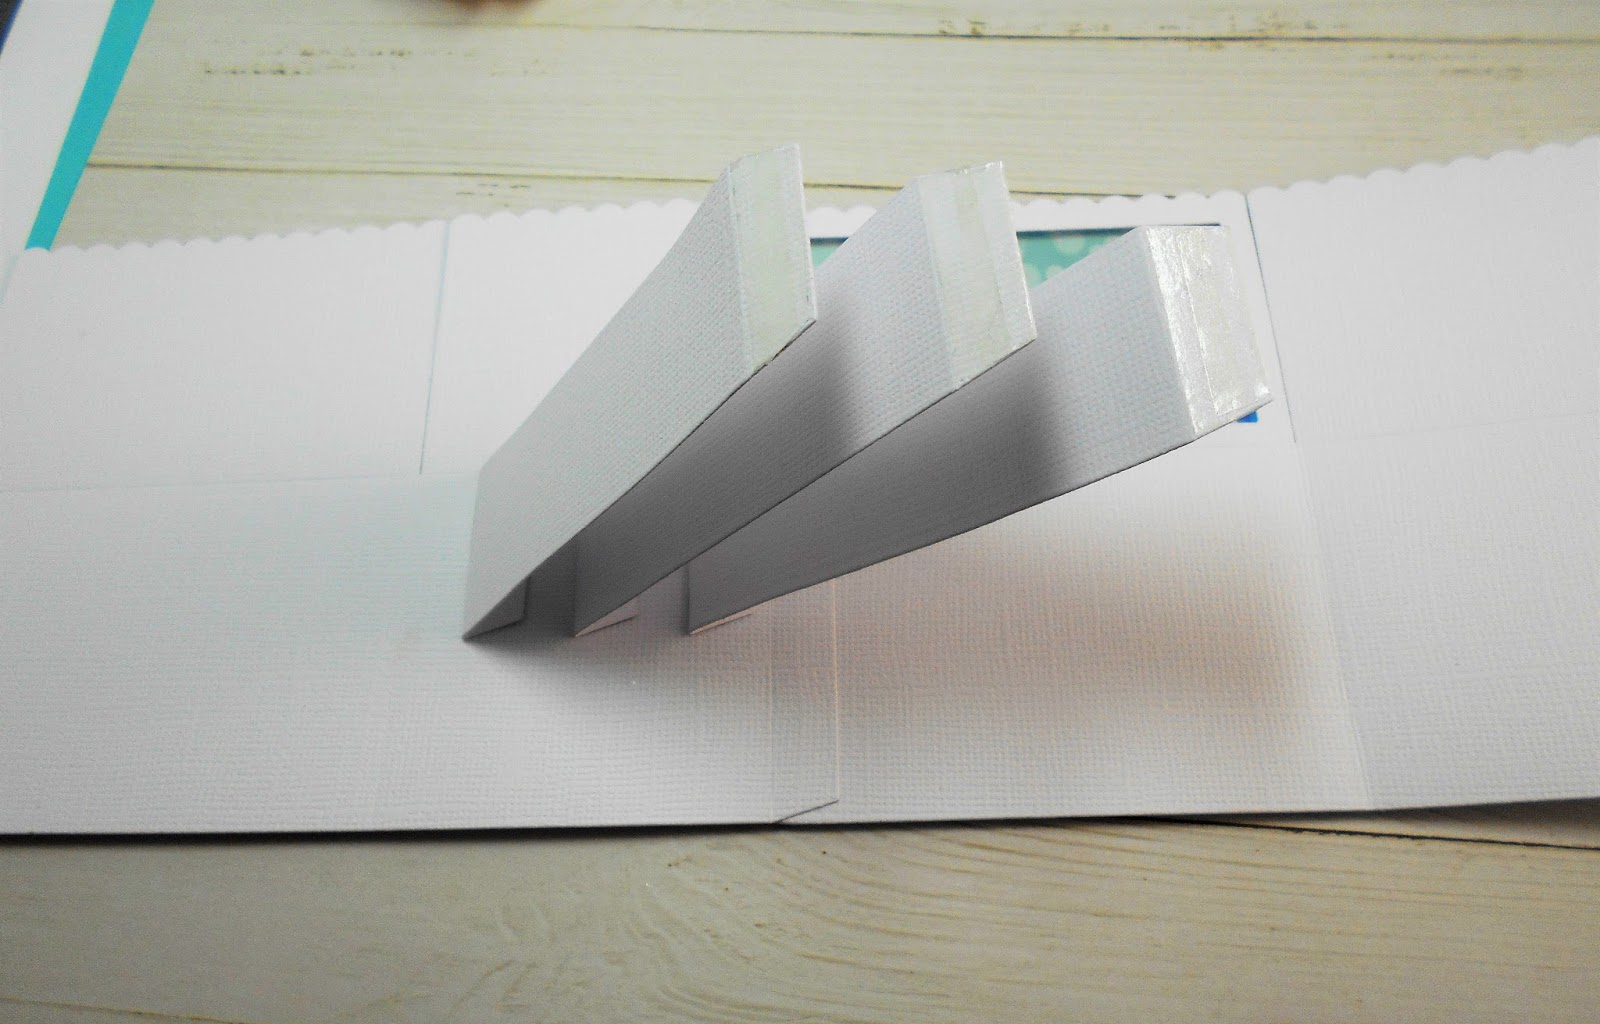
I then taped each end of the inserts I placed them on the smaller 
section equally apart.


I taped the joining piece on the end and if you lay them all flat
you fold the bigger section down and they all fit perfectly in the
 right spots.

this how it folds for a standard envelope too!


With all its layers on and you can see the shaker.


Then to decorate! I used Christmas as I like to do Christmas
Cards 2 a month so by the time I get to Christmas I have done
most of them. I used the Fabulous LF Cheery Christmas Set.


Love the way it come out. The sentiment is from
LF Big Scripty Words Winter.


All these products and more are avaliable at the
The Rubber Buggy Shop and don't forget to visit us on Facebook  look for the Videos
down the side too, Instragram and the Rubber Buggy Design Team Blog
 where there's a post nearly everyday from one of the team.

Happy Crafting
Jennifer

Monday, 28 August 2017

La-La Land Crafts Use or make a Window Card


Hi Everyone I am here with my Card for
the theme of the week is
so this is my take on it with Frenchie looking out the
 shaker window at the Christmas Tree.
I have Embossed the background of the window with a
 snow stamp and then then used Oxide Ink in Broken Glass.
I then flicked it with water and blotted it off.
The Stamp I used is 
Dies 
Copics
Frenchie - E40, E41, E43, E44
Ears - R20, E40
Hat - BG0000, B000, BG01, BG02, BG05
Hat Trims - C0, C01, C03

Click on the buttons below to find us on these social media sites:
Related Posts Plugin for WordPress, Blogger...