Followers

Wednesday, 31 August 2016

The Rubber Buggy - Fiona Loves Flowers


Hi I am here with my post for The Rubber Buggy  with a new card I created using
and these Gorgeous new papers are from Maja Summertime Collection
Flowers are from Wild Orchid Flowers
I have coloured her up using Copics
Colours used are 
E0000, E000, E00, E01, E11, E30, E31, E33, E43
Y21
YR23
R32, R35, R37, R59
G20, G21, G23

The yellow flowers were not the right colour so I coloured roughly over
them with copics and then dropped a few drops of colourless blender on
them which spread the colour evenly and I now have the right colour.


All these products and more are avaliable at the
The Rubber Buggy Shop and don't forget to visit us on Facebook  look for the Videos
down the side too, Instragram and the Rubber Buggy Design Team Blog
 where there's a post nearly everyday from one of the team.

Enjoy your Crafting Week Everyone!

Jennifer


Monday, 29 August 2016

La-La La Crafts - Use Kraft


Here we are Monday again. I have not been well for the last week
but did manage to get to the big paper show in Melbourne a 3 and a 
half hour drive.  We went down and back in the one day. 
We had a lovely time catching  up with lots of Crafty 
Friends while there and even managed to get some shopping in.
So being very tired I have not got together your Candy I will
do that on Wedensday as I have another Post tomorrow night and 
will run it until the end of the week.
So here is my Post for 
our Theme this week is 
 I am not a lover of Kraft Cardstock but was Super impressed with the
way my Card came out!
Don't forget to hop on over to see all the Girls Amazing Cards!

Stamp
Copics
Face - E0000, E000, E00, E01, E11
Hair - E#1, E33, E35
Hat and Jacket - B91, B93, B95
Shirt,and Drum - Y21, YR23, E33
Boots - E30, E31, E33
Scarf andPom Pom - R24, R27, R29
Pants - E41, E43, E44

Also don't forget to join in all the La-La Land Crafts fun by adding
your creations to our Facebookpage and Twitter and for
more Inspiration we are now on Pinterest.

Saturday, 27 August 2016

I Knead You


I Created this fun card for my Sisters Birthday. I got
the inspiration from Anna Kossakovskaya  for this cutie! 
I have used MFT - I Knead You
and sentiment from MFT - Cool Cat
I have Distress Inked the background using Tumbled Glass,
 Dusty Concorde and Milled Lavender
I have sprayed it in Perfect pearls.
The frame Mama Elephant - Madison Avenue  is raised 
And I have used the Lawn Fawn - Loads of Fun washing machine stamp 
and die cut the centre to turn it into a Shaker Card!
Sequins are from Auzz Trinklets
Copics
C0, C01, C02, C03, C05
V12, 15
BG11, 13


Happy Birthday Kristine!

Thursday, 25 August 2016

Tutorial Thursday - Exploding Card

Hi I'm  here  with Tutorial Thursday for
and today we are creating an Exploding Card. 
They look Amazing with there 3D features
 yet they fold down flat to send in the post.

This is the outside of the card and you will need to cut a piece
of cardstock 5 inches x 12 inches and score on the longside at
5, 10 and 10 3/16.

This is the centre of the Card.  A piece of Cardstock
10 inches x 4 1/4 inchesScore on the long side at
 4, 5 and 6 inches. I inch in from both ends on the 
5 inch score place a cut from the 4 inch score line to the
 6 inch score line. Then on each end of  the 5 inch score
 line measure 1/2  an Inch either side and up the score
 1/2 an inch to make a triangle 

Then cut out the 2 triangles and it will look like this.

Now to do the sides  you need to cut 2 pieces of double
sided paper at 6 x 10 inches

Score at 5 inches along the long side and fold in half with the
 open end facing up. Which ever colour is folded in is the
 colour that will be on the inside of your card.

Then fold the bottom left corner up to the top open edge.

I found it easier to use graph paper with inches on it to make
 scoring straight. So you flip your side piece over as in the picture.

You are going to score starting at the bottom 2, 3, 4, 5 inches across.

Now to start folding open it up and starting from one corner as
 in the picture you are going to make mountains and valleys
 make sure you start with the mountain.

and continue until half way. Then start on the other corner
 and do the same again until the centre.

It should look like this.

The outside of it.

Now to fold it altogether the bottom naturally just folds in.

and will look like this.

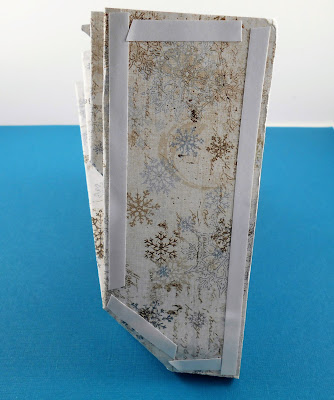
Then place tape around as show on both sides on each of your sides.


and tape them to the outside of the card


as shown here. Oooops  I forgot to take the earlier photos so
 there is a difference in the paper colours but still blue.

and the second side as well.

Then tape your centre in making sure not to put tape on the pop up bit.

Then decorate as desired.
I have used

I also placed a card on the inside base  cut to 4 x 3 inches and
folded in half and taped down.

Folded up on the outside you can pop a belly band around it to
 hold it shut , ribbon or half velcro dots which I chose. now
 ready to be posted.
Hope you enjoyed this tutorial and looking forward to seeing
 you all decorate yours up.

Also don't forget to join in all the La-La Land Crafts fun by adding
your creations to our Facebookpage and Twitter and for
more Inspiration we are now on Pinterest.

Happy Crafting
Jennifer

Wednesday, 24 August 2016

Deep Ocean - Things with Wings


Well here I am again I have lots of postings this week!
This Posting is for 
and the Theme this week is
and our Wonderful Sponsor for the Fortnight is
I am Roses

Dont forget to see the Girls Great Makes on the

Papers Maja
Dies are from La-La Land Crafts and Doohickeys from Magnolia Stamps


Another Christmas Card Created!

Tuesday, 23 August 2016

The Rubber Buggy - Christmas Gift Cards


Hi Everyone I am here with my DT Post for The Rubber Buggy .
This week as it is getting closer to Christmas it was time
to start the Gift Cards.
I  have used the Sweet New Bunny Wishes Stamp Set and
matching Bunny Wishes Die Set combined with some
Lawn Fawn to Create these 3 Cards.

This First one is a Shaker Card I have stamped the sky with snowflakes
 from Lawn Fawn Critters in the Snow . I have then used the 
Snowflake Die from Lawn Fawn Mini Snowflakes and the
Mountain is Lawn Fawn Stitched Hillside Border Dies and then created

I used Basicly the same as above but added some
 Lawn Fawn Sweet Heart Twine and layered it all with some dimentions.

I added a tree in this background  with the cute Bunny.
It is such a fun set to play with and so many more stamps in it
to create with.

Copics used
E50, E51, E53, E55
R20, R27, R29, R59
BG10, BG11, BG13
YG11
G21, G63

Some Quick Links

All theser products and more are avalible at the
The Rubber Buggy Shop and dont forget to visit us on Facebook  look for the Videos
down the side too, Instragram and the Rubber Buggy Design Team Blog

 where there's a post nearly everyday from one of the team.

Enjoy your Crafting Week Everyone!

Jennifer


Monday, 22 August 2016

La-La Land Crafts - Stitches


Hi Everyone a Big Welcome to all my new followers and I see
I have reach 500 so we better have a give away next Monday. 
I will sort something out for then :)
Wow another Week closer to Christmas already. So that's  a good reason
to create a Christmas Card.
So the Theme over at 
is
don't forget to pop on over and see all Team Mondays Beautiful Makes 
 I have Created A shaker Card using all these Beautiful Stamps and Dies.

Stamp 
Winter Coat Paper Doll Marci
Dies
 Three Christmas Trees
Large Snowflakes (Set of 2)
Double Stitched Squares (Set of 4)
 Christmas Hill Border

Copics -
Face - E0000, E000, E00, E01, E11, R20, RV06
Hair - E27, E29, E57
Outfit Trims - C0, C01, C02, C03
Outfit - B0000, BG000, B00, B01

Also don't forget to join in all the La-La Land Crafts fun by adding
your creations to our Facebookpage and Twitter and for
more Inspiration we are now on Pinterest.
Related Posts Plugin for WordPress, Blogger...