Uniquely Creative Products Used:
- UC1881 Elf Christmas Stamp Set
- UCD2077 Elf Christmas Die
- UC1882 Elf Hugs Stamp Set
- UCD2078 Elf Hugs Die
- Elf Christmas Mini Cut-a-Part Sheet
- Elf Christmas Patterned Papers
- 6mm Double Sided Tape
- Peony Cardstock
- Ocean Cardstock
- Slim 3 Irregular Window Die
- Cut-a-Part Essentials #6 Die
- Cut-a-Part Essentials #9 Die
- Foam Mounts
Other Products Used:
Copic Colours:
- Skin – E0000, E000, E00, E04, E11, E21
- Snowman – B0000, B00, B01
- White – C00, C0, C01, C03
- Yellow – Y00, Y15, Y21
- Aqua – BG11, BG45, BG49
- Pink – RV55, RV63, RV66
- Red – R35, R37, R39
Card Size: 9.8cm x 22.1cm
Instructions:
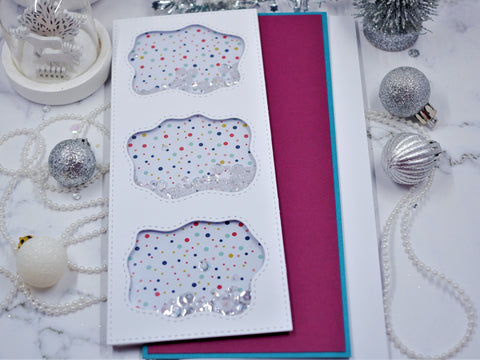
1. From white cardstock, cut base piece 19.7cm x 22.1cm. From Ocean cardstock, cut 9.7cm x 22.1cm piece and from Peony cardstock cut 21.6cm x 9.3cm. Die cut Slim 3 Irregular Window die from white cardstock.
2. From acetate sheet, cut 8.5cm x 20.5cm piece. Create a shaker using acetate, Slim 3 Irregular Window die cut piece and patterned paper. Add sequins as the shaker element.
3. Layer and adhere the Ocean, Peony and Shaker pieces on the white cardstock base.
4. Die cut scalloped circle from Peony cardstock and cut-a-part sheet using Cut-a-Part Essentials #6 and #9 dies. Colour images using the colouring medium of choice, and die cut with matching dies.

5. Finish assembling the card by using foam mounts to adhere the stamped images.

We hope you enjoyed Jenny's tutorial, and try this slimline Christmas card for yourself


.JPG)
.JPG)
.JPG)
.JPG)
.JPG)
.JPG)
.JPG)
.JPG)
.JPG)


.png)


